Suppose you are unable to find your answer here in our documentation. In that case, we encourage you to search our Knowledgebase, watch the beginners' Video Tutorials, and perform a Search for your answer. Chances are your question or issue has been brought up already, and the answer is waiting to be found. If you cannot find it anywhere, please check out the guide "How to get theme support". Thank you, we hope you enjoy using the theme!
Table of content
The theme is one of the best documented on Themeforest, it comes with :
- 100 + help articles written by us
- 34 Meticulously-scripted and professionally-produced HD video tutorials for beginners
Extensive setup guide.
- In-Dashboard Contextual Help. There are little helpers everywhere in the interface that let you retrieve quick information about the fields you are currently viewing.
- The theme utilizes standards for any WordPress theme sold on Themeforest functionality - Revolution Slider, Drag and Drop builder based on Visual Composer and Theme Options panel based on Option Tree, and any user with prior experience with ThemeForest themes will feel pretty comfortable with this theme.
Introduction
Hi, we are VamTam Creative Design Agency specializing in Premium WordPress Themes. We are passionate about good design and strive for perfection in our work.
If you are new to WordPress and this is your first site using this platform, it is a good idea to learn WordPress before working with the theme. We have 34 meticulously scripted and professionally-produced HD video tutorials for beginners that will help you to get familiar with WordPress
Please note that you have to be logged in to our Help Desk to see the video guides.
Help us out!
We continually work on our documentation, so please let us know if you have any issues!
If you feel that our documentation has errors or can be improved, please contact us.
Any contribution is much appreciated.
Thank you!
Licensing Terms
Please be advised that to use the theme legally, you need to purchase a separate license for each domain you are going to use the theme on. A single license is limited to a single domain/application. For more information, please refer to the license included with the theme or Licensing Terms on the ThemeForest site.
Installation and Updates
Nex - Factory & Industrial WordPress Theme has been tested on all major browsers and the latest version of WordPress. We have reviewed the setup process multiple times and provided the best possible instructions.
We strongly recommend you use a fresh install of WordPress and integrate your content into the pages according to the documentation. Of course, you can try to implement the theme into your current WordPress, but we will not provide in-depth support. The theme has specific settings that may conflict with your current setup of categories, plugins, javascript use, and more.
Requirements for Nex - Factory & Industrial WordPress Theme
To use Nex - Factory & Industrial WordPress Theme, you must run WordPress 4.4 or higher. Below is a list of items you should ensure your host can comply with.
- Check to ensure that your web host has the minimum requirements to run WordPress.
- Always make sure you are running the latest version of WordPress
- You can download the latest release of WordPress from the official WordPress website
- Always create secure passwords for FTP and Database
Install & Activate VamTam Theme
Before proceeding with the theme installation, check the Guidelines for Safely Importing Demo Content into an Existing WordPress Installation
You may check our in-depth installation tutorial or follow the instruction below:
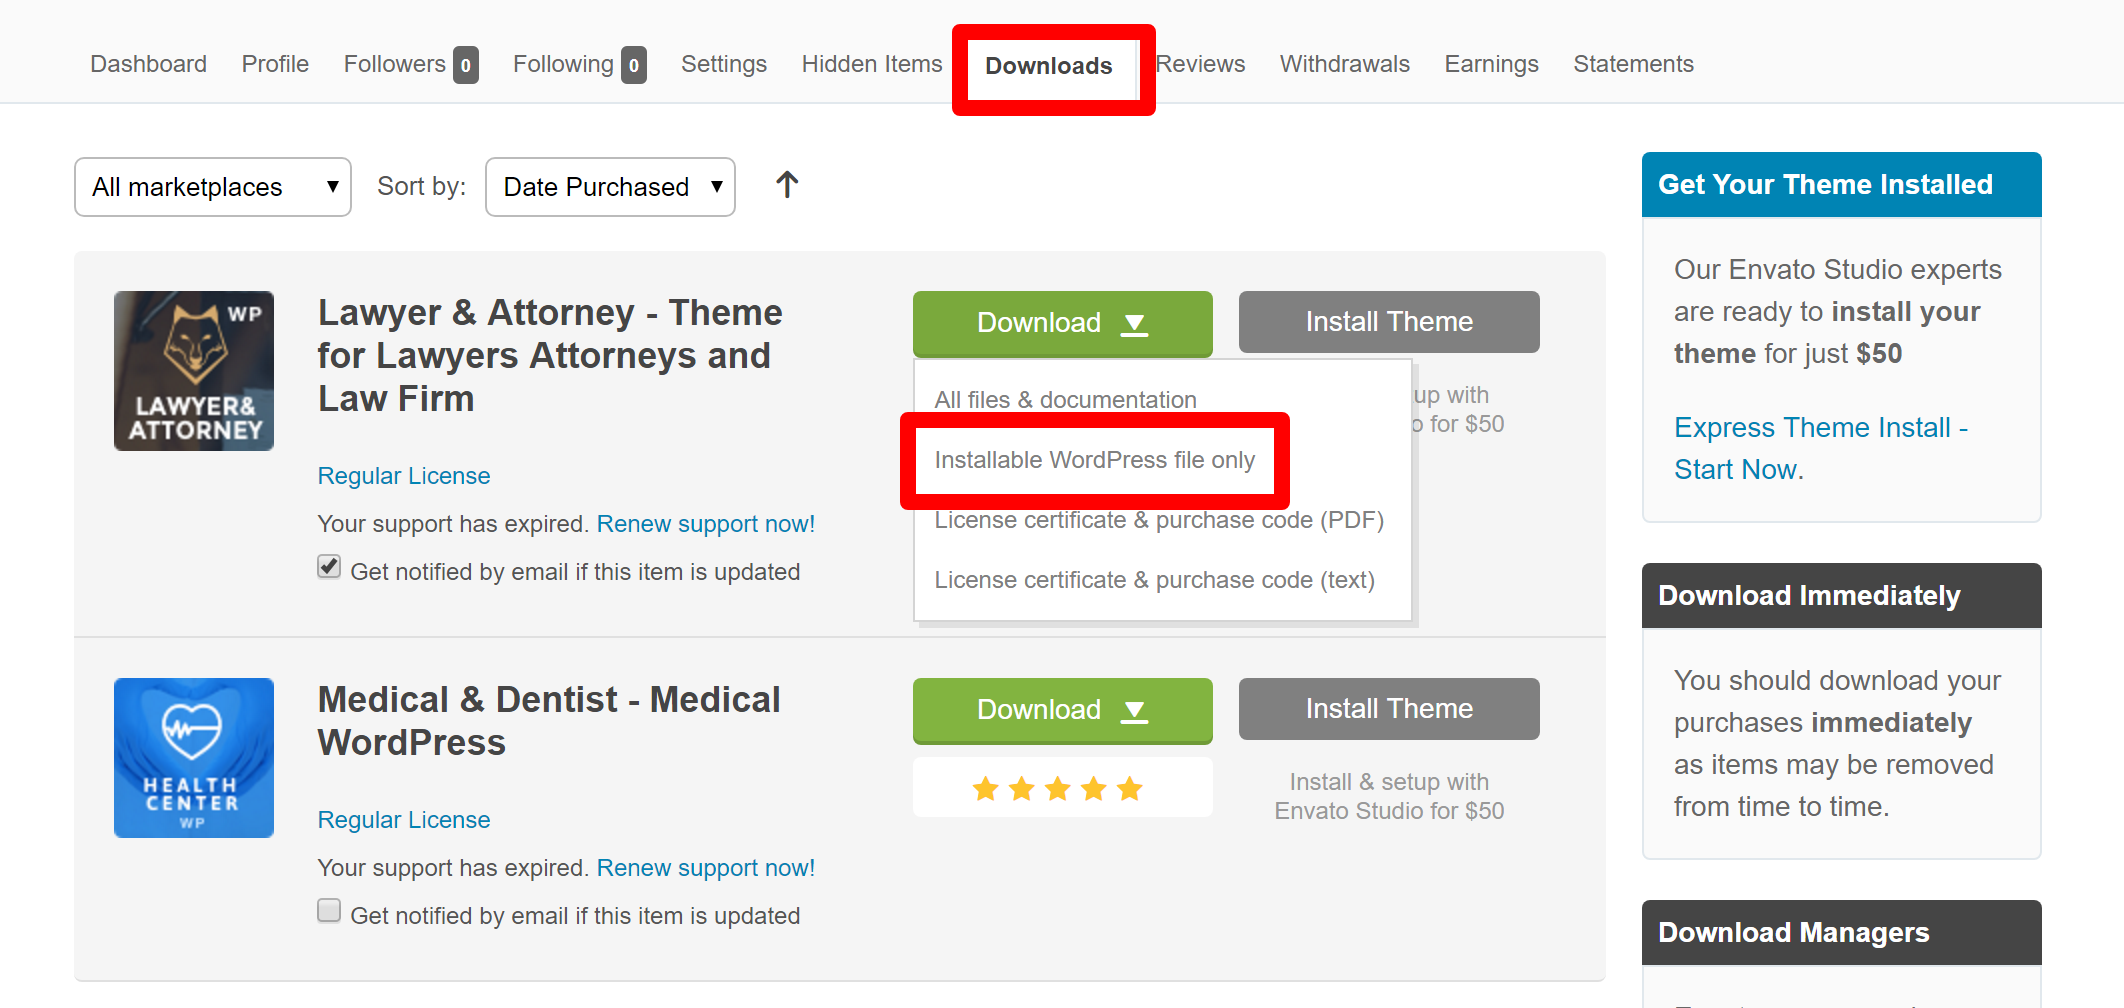
1. Download the "Installable WordPress file only" from your ThemeForest Account - "Downloads" tab.
2. Log in to your WordPress Administration Panel.
3. Select the Appearance panel, then Themes.
4. Select the "Install Themes" tab and select Upload.
5. Browse your computer to select the "themename".zip file you've just downloaded.
6. Click Install Now, and WordPress will work its magic and install the theme.
7. Activate the theme
8. Now go to General Settings and click the "Save changes" button to update the CSS styles
Install the recommended plugins
When you first install any WordPress theme, it will not contain all the extra content you might have seen in the live demo. The first step in recreating the live demo is to install the recommended plugins.
You can do this from
Appearance > Install Plugins
Live Demo Content. How does it Help Me?
Please note that you must install the required plugins before importing the dummy content.
This is a great feature that helps novice WordPress users and veterans alike. This feature makes the necessary settings/configurations and installs demo content in the WordPress theme: categories, pages, posts, and widgets.
Your VamTam theme will look exactly like the one you see in our live preview. It doesn't matter if you know WordPress inside out or have seen it for the first time. It's always easier to modify posts, categories, pages, and widgets that are already there rather than creating them from scratch. Moreover, it is easier to understand how your new VamTam theme works.
Our Demo Content is a tremendous feature that will save you a lot of frustration and headache at a press of a button. Try it out. We promise you won't be disappointed.
Due to copyright restrictions, please note that the dummy content doesn't come with the original images. If you like the images from the demo and you intend to use the theme, check out the guide "Stock used in the theme" in the section "Changelog and Credits"
You will notice that widgets, content, and Revolution Slider demo slides can be imported separately.
You can access the feature from your WordPress admin panel:
WP navigation menu > Appearance > VamTam Theme Setup > Step 3: Content, Widgets, Slider Revolution, Max Mega Menu or Ninja Forms
Click on Save Changes.
Logo
Using a Text Logo
- Go to Dashboard > Appearance > Customize > Site Identity
- Locate the Site Title item.
- Change it to what you like.
- Click the "Save & Publish" button.
Using an Image as a Logo
1. Go to Dashboard > Appearance > Customize > Site Identity
2. Locate the "Custom Logo Picture" and upload your logo.
3. Click the "Save & Publish" button.

Menu
WordPress automatically creates a menu of your pages for you, but the Custom Menu feature gives you complete control of what appears in the menu, where it appears, and also the menu title. The page title you want to use will often take up a big part of the width of your header where the navigation menu appears. The custom menu allows you to shorten or change the name that appears in the navigation.
We use the Custom Menus feature in all our themes. You must create one if you haven't imported the demo content.
If you need detailed info on this topic, please read this guide:
Problems Installing?
On rare occasions, our themes may not be installed properly. If you have any issues with installing the theme, you might want first to check the
Common Installation Issues Guide
Updates
If you need to update a theme to a newer version, check this guide:
Envato Elements Clients can only update the theme and bundled plugins using FTP.
The latest version of the bundled plugins can be found in this directory /theme-name/vamtam/plugins.
You can check the theme's changelog here: https://vamtam.com/changelog/
Layout
Changing the layout is easy and takes place in the theme's options panel:

Global layout options are located here: Go to Dashboard > Appearance > Customize > Global Layout
Boxed or Full-Width Layout
You can set the general layout of the website from Go to Dashboard > Appearance > Customize > Global Layout
Header Layout
Go to Dashboard > Appearance > Customize > Top Bar or Header
In this section, you can change the Header and Top Bar layouts and set the height of the header area.
You can enable or disable the SEARCH.
This will be the default layout for all pages.
Body Layout
Go to Dashboard > Appearance > Customize > Body
In this section, you can enable or disable the body top widget areas and the body sidebar areas.
You can set the width of the sidebars.
This will be the default layout for all pages.
If you need detailed info on this topic, please read this guide:
How to activate sidebars and add widgets to them?
Footer Layout
Go to Dashboard > Appearance > Customize > Footer
You can enable or disable the footer widget areas and choose the desired layout.
This will be the default layout for all pages.
If you need detailed info on this topic, please read this guide:
How to activate sidebars and add widgets to them?
Styling Your Website
You can easily edit the colour and the background of each website entity. Just follow the instructions below.

Styling of Elements
- Go to Dashboard > Appearance > Customize > Styles > Global Color/Background Settings in your back-end.
- You will see accent colours - all website elements are attached and grouped to these colours. Simply change the colours using the colour picker or input the colour value in the box.
- Click the "Save & Publish" button after you finish editing.
Changing Backgrounds
- You can change the background of the website's different sections: header, body, and footer. You have also general page background located in Go to Dashboard > Appearance > Customize > Top Header or/ Header or/ Body or/ Footer
- Locate the section that you want to change.
- You can choose a colour or an image as a background.
- If you choose an image, you can make it full screen by switching on the "cover" option.
- Select the image repeat method in the drop-down.
- Click the "Save & Publish" button after you finish editing.
Changing Fonts
The general font styling options are: Go to Dashboard > Appearance > Customize > Global Typography. The options for styling the fonts in the website's different sections are located in Go to Dashboard > Appearance > Customize > Top Header/Header/Body/Footer.
Styling the Menu
Menu styling options are available in Dashboard > Mega Menu > Menu Themes (if you have the Max Mega Menu plugin installed)

Mobile header layout options are available in Dashboard > Mega Menu > General Settings (if you have the Max Mega Menu plugin installed)

If you need more info, please read this guide: Guide to Max Mega Menu
Using Custom CSS
There is a limit to what the theme options can do. When trying to customize colours, text, margins, padding, control an element's size, etc., options aren't always the best solution. The preferred way to do it is with your CSS
- Navigate to Appearance » Edit CSS
- Insert your custom CSS code into the "Edit CSS" text area.
- Press the [Save Stylesheet] button. Your custom CSS styles will be added at the end of the main theme stylesheet file (thestyle.css.phpfile). Please note that your custom styles may not apply immediately as the main theme stylesheet file is being cached by your browser. To empty the browser cache and load the new stylesheet, please try to reload the website by pressing the CTRL + R key combination several times.
If you need more info, please read this guide:
How to add custom CSS / PHP code or modify the theme code
How to add/edit the pages' content
The Beaver Builder Plugin is integrated into the Nex - Factory & Industrial WordPress Theme.
To start building layouts, open any of your pages in the Pages section of your website Dashboard. Within each page, click the Page Builder tab to launch Vamtam Beaver Builder.
Start Vamtam Beaver Builder for a new page:

Start Page Builder from the Add New Page or Edit Page screens when you create a new page.
Click the Page Builder tab to the right of the Text Editor tab, as shown in the following screenshot.
Start Vamtam Beaver Builder from the Admin bar:

After saving a page built with Vamtam Beaver Builder, you can click the Vamtam Beaver Builder in the WordPress admin bar to open the page for editing with Vamtam Beaver Builder.
Guide to Vamtam Beaver Builder
Setting up pages
Global Options
Any VamTam theme has global options valid for all pages/posts, archive pages, and custom post types. You will see the global options Dashboard > Appearance > Customize
Local Options
You have an option to override some of the global options. These options are below your text editor in pages/posts/portfolios. You can create a unique style and layout for any page/post/portfolio post.
Setting up the Home Page
Any page you create can be set as a Home page.
Please navigate Settings > Reading your WP Admin Dashboard and select the static page. Now you can choose any existing pages as a Home Page from the drop-down menu.
Please note that even if you want to display a classic blog on the front page, you must create a static
blog page with the blog shortcode and follow the steps above. You do not have to choose "your latest post" or
set any page as a blog post page. These options will enable the standard WordPress blog styling.
Reviews
The theme comes with a Guestbook Page Template that helps you have a beautiful Guestbook only using the standard WordPress Comments. Here is a guide:
Setting up Blog Listing Page and Blog Posts
Setting up Blog Listing Page
- Please navigate to Pages > Add New
- In the VamTam Builder, click on the "Blog" element. Once the element is inserted, you can click the "edit" button to change its settings. You can control - the number of posts per page, pagination on/off, the image on/off, and showing a particular category or a post.
- Publish changes.
In Customizer > General > Posts, you will find options to hide the meta info and pagination type.
Blog Archive Pages: Categories, Post formats, Tags, Monthly Archives. These blog listings are created automatically. In Customizer > Layout - you can change the default layout and, respectively, the layout of the blog archive pages.
Setting up Blog Posts
Creating Blog Post
- Please navigate to Posts > Add New
- Choose the category, tags, or post format from the options on the right-hand side.
- Set the post format settings according to the help text above the editor.
- Publish.
You can customize the layout and style of your Blog Post in two locations:
Global Layout and Styles
Global Layout
If you need to change the layout - please navigate to Customizer > Layout.
If you need to change a particular website area, go to the tabs - header, body, footer.
Global Styles
If you need to change the style (colours, backgrounds, typography), please navigate to Customizer > Styles
if you want to style a particular website area, go to the tabs - header, body, footer.
In Customizer > General > Posts, you will find options to hide the meta info.
Local Layout and Styles
You have an option to override some of the global options. These options are located just below your text editor. You can create a unique style and layout for any blog post.
If you need more info, please read this guide:
Guide to Blog listing and Blog posts
Creating a Portfolio Listing Page
Please do the following to create a standard portfolio:
- Please navigate to Pages > Add New
- In the VamTam Beaver Builder, click on the "Portfolio" element.
- Once the element is added, click on the edit button, choose your setting and click on the "Save Element" button.
- Publish changes.
Creating a Portfolio Item
A portfolio item is a single entity of your portfolio collections. It can be a photo, project, design, product, etc.
- Go to Portfolios (in the main WP navigation menu on the left) > Add New.
- Select the Portfolio item post format - gallery, image, video, link, document, HTML.
- Set the post format settings according to the help text above the editor.
- Attach the post to a category/ies. They are found on the right-hand side.
- You can add different description text that will show in the portfolio items listing page to the excerpt module, found below the text editor.
- Publish changes
Image - Use the standard Featured Image option for the portfolio image. Use the editor for your content. Clicking the image on the Portfolio listing page will open the image in a lightbox. You will need the "Link" post format if you want to click on the image to lead to the portfolio post.
Gallery - Create a gallery using the "Add Media" button in a text/image block element. This button is also found on the top left side of the visual and text editors. Please note that when the media manager opens up in the lightbox, you have to click "Create Gallery" on the left and select the images for your gallery.
Video - Put the URL of the video in the post format option field above the editor. You must use an oEmbed provider supported by WordPress or a file supported by the [video] shortcode which comes with WordPress. Vimeo and Youtube are supported.
Link - Use the standard Featured Image option for the portfolio image. Use the editor for your content. Put the link in the post format option field below if you want the image in the portfolio listing to lead to a particular link. If you leave the link field blank, clicking on the image on the portfolio listing page will open up the portfolio post.
Document - Use the standard Featured Image option for the portfolio image. Use the editor for your content. The image will only be shown in the portfolio listing. You will need the "Link" post format if you need the featured image to appear in the post itself.
HTML - Use the standard Featured Image option for the portfolio image. Use the editor for your content.
You can customize the layout and style of your Portfolio Posts in two locations:
Global Layout and Styles
Global Layout
If you need to change the layout - please navigate to Customizer > Layout.
If you need to change a particular website area, go to the tabs - header, body, footer.
Global Styles
If you need to change the style (colours, backgrounds, typography), please navigate to Customizer > Styles
if you want to style a particular website area, go to the tabs - header, body, footer.
In Customizer,> General > Posts, you will find options to hide the meta info.
Local Layout and Styles
You have an option to override some of the global options. These options are located just below your text editor. You can create a unique style for any project post.
If you need more info, please read this guide:
Guide to Portfolio listing and Portfolio posts
Setting up the slider
We always recommend importing the demo content. If you had done so, you would have imported the sample sliders that come with the theme and replicated the one on the demo website. You can use these sliders as a starting point for your website. The "sample sliders" are well-designed and complex. They must be used if you are not yet familiar with the slider and theme options. Revolution Slider is a powerful and complex parallax slider. It gives you unlimited opportunities to create slides with many sub-layers with different animations. Please note that the Revolution Slider is a plugin and has its option panel found in the leading left side navigation menu - Revolution Slider.
Setting up the WooCommerce plugin
The theme is compatible with WooCommerce and includes full design integration and custom shortcodes.
If you don't need WooCommerce, simply don't install it; all the features, codes, and anything required for WooCommerce will not be loaded. Vice versa, if you need to set up WooCommerce, just install it as you do with other plugins - WooCommerce Plugin. Once installed and activated, the WooCommerce menu will be added to the WordPress main navigation menu on the left.
The Woo sample products from our demo website are not included in the general demo content import. If you need the sample events from the demo website - please open a ticket at our Help Desk - support.vamtam.com.
Setting up the Events Calendar plugin
You can find more information in this article: Guide to The Events Calendar Plugin
Setting up the Event Tickets plugin
You can find more information in this article: Guide to The Event Tickets Plugin
Setting up Ninja Forms Plugin
You can find more information in this article: Guide to Ninja Forms Plugin
Setting up Jetpack plugin
You can find more information in this article: Guide to Jetpack plugin
This theme requires to activate the Unplug Jetpack plugin as well: Guide to Unplug Jetpack pluginTheme Support
To help speed along your request, we require that you follow the steps below before posting a ticket on the Help Desk.
Step 1
First, please take a moment to search this page and the other help guides, as the answer to your question is likely already here. You can press CTRL+F in your browser and search this page for keywords. Or, browse the topics in the navigation menu. It's the fastest way to get the answer you need!
Step 2
If your question has not been brought up, then please open a ticket and always include:
Your live site URL that shows the issue
The version of the theme and version of WordPress you are using
The specific browser or device involved, if applicable
Detailed information describing the issue
Possible screenshots of the issue
Step 3
You may include your WP & FTP login info to speed the process up.
Step 4
Let Us All Be Civil and Happy People.
Posting a ticket in the Help Desk
Before contacting us, please enter your purchase code in the VamTam > Dashboard > Register. We need this information for verification and testing purposes. Please also provide the URL of your installation.
If you have difficulties finding the purchase data, check out this guide: Envato Purchase data
If you have installed the theme on localhost, please provide the Item Purchase Code in addition to entering the purchase data in VamTam > Dashboard > Register

Envato Elements Clients are not entitled to Support from the Author. However, you can find hundreds of articles in the KnowledgeBase. If you need support, you can buy a license here.
Contextual Help Documentation integrated into WordPress contextual help
This theme extends WordPress contextual help with many useful topics. If you get stuck using the theme, please check this source first. You may also visit this User Manual if the topic is not displayed in contextual help.
To access contextual help, hover over the "Help" balloon below the titles of each option.
Support Channels
VamTam provides theme-related support via our Help Desk, knowledge-base & video tutorials.
Why not a Support Forum?
Simply put, we can offer you superior support.
A forum works only when you have a large enough active community - thousands of people willing to participate daily. The smaller the community, the more likely you will wait for a long time before someone answers your question. Unfortunately, even the top authors in Themeforest have only a few hundred active users daily, which is not enough to make the forum work.
Why not the Themeforest Comment Board?
1. Help Desk functionality is lacking - assigning, escalating, and prioritizing tickets is not possible.
2. It is difficult to track communication.
3. It is a public channel; you can't send sensitive information - FTP/admin credentials.
Support Hours
Our general support hours are Monday to Friday, 0 - 24h. During this time, we can generally provide feedback on any support queries within 6 - 14 hours, while we will also commit to answering any questions during weekends and holidays within 24-48 hours.
Extent of our Support
All our items come with free support, and we have a dedicated support team to handle your requests.
We only cover support for our themes and cannot give general WordPress support that isn't related to our themes. For general WordPress support, you will have to use the Video Guides for Beginners and www.WordPress.org/support
We are not able to provide support for code customizations or third-party plugins. We understand that there is a fine line between what is considered support & modifications. So while we will try to help you with any type of query (support or modification), we cannot provide extensive help in terms of modifications. Technical support will thus take priority over modification support.
Definition of Modification Support
If you request modification help, which only requires us to publish a couple of lines of code, we will gladly assist you. If your query requires more than that amount of code to be published, we can only provide guidance, and you would then need to hire a developer if you don't have the skills to implement it yourself.
Bug Fixing
Our commitment is to fix all theme bugs as quickly as possible after they are brought to our attention. We can fix bugs within 24 - 48 hours during our general support hours.
Thank you for purchasing our theme. Before you start, check out this setup guide and the relevant "How to Guides". We outline all kinds of good information and provide you with all the details you need to use the theme.
Suppose you are unable to find your answer here in our documentation. In that case, we encourage you to search our Knowledgebase, watch the beginners' Video Tutorials, and perform a Search for your answer. Chances are your question or issue has been brought up already, and the answer is waiting to be found. If you cannot find it anywhere, please check out the guide "How to get theme support". Thank you, we hope you enjoy using the theme!